Sunday, March 31, 2013

Karly's Dress (No. 1)

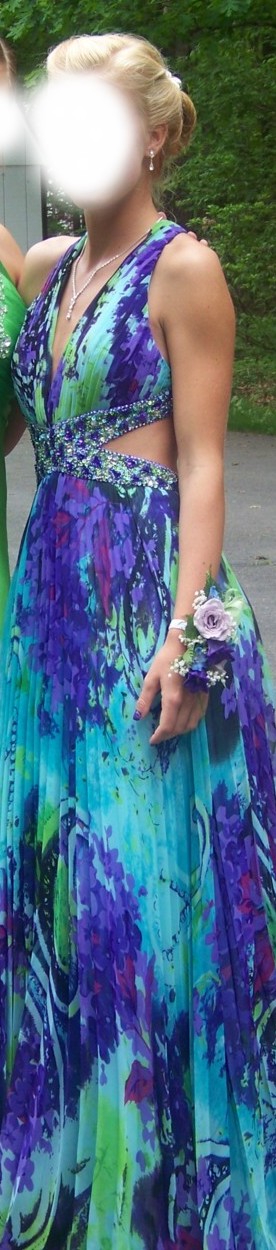
Here is Karly in her superbly-fitted prom dress.  It didn't start out that way though.  There were some issues that needed to be addressed in order to have it molded to her figure, and what a figure she has!

These were the alteration issues that needed to be performed:
  1. Shortening of her too-long straps.
  2. Removing extra fabric in the hip area for a custom fit.
  3. Rehemming the too-long dress
  4. Creating a bustle to her liking.
When I begin alterations, my approach is typically a top/down philosophy because what is altered on the top may have an effect on what happens at the bottom.  So the first alteration to be performed was the shortening of the straps.

On the back of the dress shown below left, you can see how the straps crisscross at a decorative point at the upper back.  I cut the straps, removed the excess, and stitched together at the edge of the decoration.  This allowed a seamless look since it was so close to the area with the bling.  The eye doesn't see the seam, unless you're about 6" away looking right at the decoration.  It was the perfect spot to do this alteration.  This was another one of those "fudged alterations".  Easy and cost effective. 

Once the straps were perfectly fitted to her body, we moved down to the hip area.  She mentioned it was too full.  With her figure, it is not a problem removing some ease.  Ease is the term used for movement room.  There two different types of ease, but I'm not going to get into that.  The type of ease needed for this dress is going to vary because of body type.  There is a basic rule to follow regarding fitting ease (the amount needed to be able to move in a garment):  firmer bodies need less ease and fleshier bodies need more ease.  Therefore, when Karly wanted a dress that was more fitted in the hip area, it was not a problem.  She is slim and firm, not fleshy.  She would still be able to move and sit, and the dress could be fitted with less ease but still provide a clean line that appeared to mold to the shape of her body.  The ease was removed in the high hip/hipline area at center back seam.  This was not my preference, but the side zip dictated where an easy fix should occur.  Of course, I could have opened up the side seams, removed the zipper on one side, performed the alteration, reinstalled the zip, and restitch the lining and dress at a cost of...$$$.   Yet the question remains:  What is the most cost effective fix that will still provide the fit she desires?  It is one that can be fudged.   The question I always have to ask myself is this, "Can the alteration be fudged and still produce a result that is visually acceptable?"  If so, this is what I recommend.  Remember, these are (usually) not $1,000+ dresses and are more in the $200-$400 range.  In my opinion, costly alterations, generally speaking, are typically not the way to go in this price range.  Once the hipline area was altered to her satisfaction, I moved down to the hemline.

The concern I have with hemlines are shoes and wearer preference.  The girls have to have their prom shoes before hemming a dress and subsequently need to know where they want their hemline to fall.  I present three basic options:  skimming the floor, 1/2" off the floor, and approximately 1" off the floor.  I offer my advice but explain to each girl that it is entirely up to them.  What they want is what I will do.  However, I'm always thinking about safety and comfort.  I've seen some girls purchase beautiful 5" heels with their prom dresses and others wearing flats.  What to do, what to do?!?!  My recommendation is usually to go 1/2" off the floor with anything over 3".  One heel caught in a dress for any reason can literally knock a girl off her feet in the blink of an eye.  If a girl has pretty shoes she wants to show off, maybe 1".  If a girl has flats or something up to 3", floor skimming is fine.

However, it can get tricky.  If a girl has her dress hemmed to a 1/2" above the floor and has 5" (or plus) heels, she's probably not going to wear them when she's on the dance floor.  So...she has some thinking to do.  Once those 5" heels get kicked under the table for partying on the dance floor, her dress suddenly becomes far too long!  It can drag and become uncomfortable with her feet or someone else's feet constantly stepping on the dragging hemline.  So we discuss and try to figure out what she wants to do.  For Karly's dress, she opted for the 1" option.  She had cute shoes that matched the crystals on the dress, and she wanted to show them off.  Her shoes had minimal heel so she could have gone with any option.  Once the shoes were off, the dress skims the floor. 

Once the new hemline was stitched, we moved on to the bustle.  We experimented with different options, and she chose the one she liked best.

End result:  a dress that molded perfectly to her perfect figure, a hemline that was to her liking, and her bustle of choice.  A happy girl with a dreamy figure in a perfectly-fitted dress that would make any girl green with envy!

Note:  This prom dress was purchased off the rack at a prom dress boutique.  For DIYers, a similar style can be whipped up at home using the McCalls 6075 pattern below.  It is currently in catalogs and probably will be available for the next year or two, however, patterns can be discontinued without advance notice.  It looks like a great pattern with different styling options with mix and match pattern pieces. 

Saturday, March 30, 2013

Kristin's Dress


Meet Kristin.  An absolutely gorgeous girl who paid $60 to have her exquisite dress rehemmed.  And here's the problem.  I was asked to do her bustle because she liked the one I did for my daughter the previous year, but had to redo the "professional" hem job for which she paid $60.

I went over her house one day to work on the bustle and found her dress not only had a terribly uneven "professional" hem, it was still too long!  This was the first prom dress I altered other than my oldest daughter's dresses at the time, and my thought was, "I could do WAY better than this!"  Yes, I could, and yes I can.  So...not only did I bustle her dress, I rehemmed it as well.


Hemming is the easy part so I'm not going to discuss that.  What I'm going to talk about is the bustle.  There are different ways to do a bustle on a dress, and I like to work with the girls and their mother by presenting bustling options.  Usually I can see in my mind what I feel is the best option, but I make it the choice of the girl with some parental input.

In Kristin's case, the bustle did the talking.  One pinch, pull it up, and it looked beautiful.  Okay, really it was a couple pinch points to be determined by the length of the dress, but once we got the right spot pinched, the bustle style sold itself.  The tricky part was deciding how to attach the bustle to the waist because it hits the centered zipper so I will explain how I handled it.

I found two, beautiful crystal-like buttons at my local fabric store and stitched them on each side the zipper at the bustle attachment location.  I used some Timtex (a stiffer, craft type of interfacing) on the inside of the dress to reinforce the bustle point area.  This is necessary because the dress fabrics can easily tear or rip with the strain of the bustle weight or with a heel caught in a hemline pulling the bustle down.  When the buttons were attached, I stitched through the dress fabric and Timtex together, treating both as one layer. I trimmed the Timtex to a circle so it wouldn't have points that would cause discomfort for Kristin on prom day.  On the lower part of the skirt, I attached loops created from a serger chain using Decor 6 decorative serger thread in a color that matched the dress.  These attached loops were placed over the crystal buttons and Voila:  A beautiful bustle was born!

Total cost:  approximately $4-$5 for materials.  I didn't charge her for any labor for the hemming or the bustle with one caveat.  She was to tell no one I did her alterations.  I was recovering from a car accident at the time and couldn't handle requests.  Hers was easy.  I had ample notice and worked on it the days I felt well enough to do the alterations. I don't like saying no to prom girls so I wanted to pull the plug on any requests so I wouldn't be forced to say that dreaded word.  

The result?  See for yourself :) !  Kristin looks AMAZING.  She is a beautiful girl in a beautiful dress that fits her like a dream and was finally altered and bustled just right.  The crystal buttons were a perfect match, and the bustle style is perfect for the dress.  The hem is perfect!  (No thanks to the first "professional" hem job that was done by someone else.)  Kristin was a joy to work with, very easy going, and easy to please. 

Monday, March 4, 2013

Julia's Dress


(Client names have been changed for privacy reasons.)

Internet shopping for a prom dress is a crap shoot.  I've said it before in a previous post.  Most of those websites with pretty prom dresses show these busty thin models that are probably somewhere between 5'9 - 6' tall.  And that's without heels.  So what do you say to a girl who buys her prom dress online? Be careful!  Read the sizing charts very carefully.  Find out the manufacturer's recommendation for sizing if the dress is snug/very close-fitting.

I can't really say buy the dress by the bust size or hip size if I don't know anything about the style.  The only thing I can definitely say is don't go down a size if you're size isn't in stock.  Better to go up one size.  Just. One. Size.

Julia's dress is the perfect example of when I'm glad to be wrong.  Her dress was purchased online.  It was out-of-stock so the date of delivery was an issue.  It worked out fine, but keep in mind sometimes the in-stock date never arrives.  I'm glad that didn't happen with Julia's dress.

It was a nailbiter for me though.  Julia is not petite.  She is average height, probably around 5'6 give or take an inch, has a full bust, and is curvy.  I saw her dress choice on the website and given her curvy figure I was worried.  Was it going to be the right style for her figure?  I had my doubts.  It's a tough call because all those prom dress models are what, like a size 2 or 4?  Maybe a 0 with C -cups to fill out the dress bodice.  And to tell the truth, I can't remember if the dress was ordered to fit her bustline or her hip.  I'm pretty sure, however, they didn't have the right size in stock given her measurements so we ordered up one size.

Anyway, I had my doubts about the style on her figure.  I'm SO glad I was wrong.  I don't really see these girls outside of their dress code attire for school or sporty clothes jackets and sweats for sports.  How was I to know she was well-balanced from head to toe with great legs.  Nothing on her body is out of proportion, for example large hips or wide shoulders so the style really worked well for her.  I especially like how the bodice cups curve down into a V on the bodice.  It draws the eyes downward and is slimming.  The short underskirt highlights her great legs and the flowy overskirt skims her curves and is slenderizing for her shape.  She is a great example of a curvy girl rocking the look.  Her height, balanced proportions, curves, great legs, it all works for her!

I had to make a few alterations for her dress.  I like working using the top-down approach.  Do the alterations starting at the neck and shoulders and move down.  My work approach is what happens on top is going to affect the bottom so start from the top first.  Hemlines are done last.

The first alteration to tackle was the bra cups on the dress.  There was gaping along the top edge of each cup from the center of the cup toward the side seam.  Hmmm...how to alter them.  The fabric is pleated so it's not a super simple fix.  Not hard, but not easy peasy.  I pinched out how much to alter via a diagonal dart beginning near the arm crease angling toward the bust apex.  Hmmm...(again!)  Should I make the dart on the inside or outside?  I'm not going to take apart the lining and fashion fabric if I don't have to--it's not worth it given the cost of the dress.  So I pinch the dart on the inside and see how it looks on the outside.  No, that doesn't look very good.  I make the dart on the outside and finger press it down.  Yes!  That looks acceptable.  Not only that, it makes it a little easier to finagle with the fabric pleating to make the dart blend in with the pleats so it's not that noticeable.

After the darts were completed, I tacked the waist.  Again, I'm trying to find a balance with the right alteration and cost for each client.  If I don't have to open up seams and can complete an alteration successfully using a different method, albeit a less costly, "fudging" method, I'm going to do it.  I typically discuss these methods with the client and parent at the initial consultation.  I made two additional vertical seams at the waistline (can't remember where I placed them but it was probably in the back near the side seams) to pull in the midriff so it hugged the waist in a pleasing way.  It wasn't tight, but it nipped in her curves to give her more of an hourglass figure.

Moving down, I tackled the hem.  Julia needed about 3 1/4" in length removed from the sheer overskirt.  The new hemline will blend into the upward curve at the bottom of the front.  I prefer any blending between a new and unaltered hem to be done as inconspicuously as possible so the bottom front was a good place to do this. As always, the goal is to accomplish the alteration so it is undetectable or inconspicuous so the visual is on the overall silhouette with no or little distraction.

Time to step back and see the big picture!  Julia looks beautiful in her gown which was purchased online.  It was purchased one size outside her range due to stocking issues, but we got it to fit and mold to her figure with minimal fuss at a very reasonable price. 

"Chicken Wings" and Other Things: The Strapless Dress

Girls, listen up.

We're going to have a talk about strapless dresses today!  I love them.  They're so elegant IF they fit right.  The problem is I see a lot of strapless dresses that just don't fit all that well on girls going to the prom.  The single most irritating issue is that of CHICKEN WINGS!   What are "chicken wings" you ask?   I'll tell you, but you have to promise me that you are going to look for them!  It's a virtual guarantee you will see several cases of chicken wings during prom dress season that range from mild to severe.  In this photo from the Burdastyle.com website, I give you your daily visual serving of "chicken wings" for the day.
Source: http://www.burdastyle.com/blog/invisible-details-of-a-couture-garment-the-waist-stay

Chicken Wings:  (my definition)  The constant pulling up of the top, front edge of a strapless dress with one's hands with the elbows pointing outward and up.

Look around at girls shopping for strapless prom dress or girls wearing them at the prom.  You will see it.  I can handle occasional chicken wings.  However, when it happens every minute or two (or even less), it drives me insane.  There is something wrong with the dress and/or fit.

There are two things I want to tell you about strapless dresses that most people who don't sew or alter probably aren't aware of:

1.  The entire dress should be anchored with something called a waist stay which is, you guessed it, located at the waist!   Strapless dresses are NOT held up on the body via the top edge of the dress.   It probably seems strange that this is so, but the structure of a strapless garment includes a waist stay to anchor the dress at the waist.  Think of it as the foundation for the garment.  The waist stay supports what's above and what's below that point.

Here is a pic of a waist stay.  It can be made in a wide variety of colors.  Source:  http://www.burdastyle.com/blog/invisible-details-of-a-couture-garment-the-waist-stay
2.  Boning (plastic in casing, Rigilene, or spiral steel) is typically inserted at several vertical areas in the lining from the waist to the top edge of the dress to provide support for the bodice of the dress.  I'm sure you know what boning is or at least what it feels like.  Most females will be familiar with it especially with bustiers being very popular lately.  You can feel boning in the bodice of a strapless dress or bustier on or near the vertical stitching lines in the lining of the garment.  It's a long, somewhat hard piece of plastic (or steel) with a bit of flexibility. 

Here is the problem I saw last season with the two strapless prom dresses I altered and didn't realize it until prom season was long over.  The strapless gowns did NOT have a waist stay.   I wouldn't make a strapless dress without one, so for some reason I wasn't thinking about it because it *should* have the stay. The waist stay has to be made to measure so it fits a particular body snugly and securely.  When dresses are being manufactured for the masses, perhaps it is just not practical nor cost effective.  It is going to be the first thing I check for in strapless gowns from here on out, and the first alteration to perform.  I like to use the top-down approach, but a strapless gown doesn't have neck and shoulder issues because of the obvious--it's strapless.  Therefore, before any other changes or alterations, that waist stay must be installed first.  IMO, it's not a maybe but rather a must-have alteration.

A waist stay is located inside the dress where it hides unseen from the rest of the world while it performs it's very important job as the dress anchor.  It can be made out of grosgrain ribbon or petersham, fits snugly to the waist, and has a hook closure at the center back waist.  It is anchored to the dress at the seams and/or important areas the dressmaker or alterations specialist feels is important for a proper anchoring system.  It does not interfere with the zipper closure.  The creation and insertion of a waist stay is a simple, cost-friendly alteration on most dresses.

Once the waist stay is been inserted into a gown or if it was there to begin with, the top edge of the dress needs to be examined.  Is there any gaposis on the top edge and where does it occur?  My preference is to examine the bodice back first then move on to the front.  I find that gaposis usually occurs in two places--at the side seams and/or in the vicinity of the armhole crease.  For prom dresses, I opt for the cheater's method and consult the parent and teen on the why's and how's of the alteration.  The cheater's method is often very effective at removing gaposis and is wallet friendly.  Any jogs in fabric from the cheater's method can be remedied with my seamstress "patch" which camouflages the jog.  It is not the correct method, and I'm quick to tell my clients about this.  The correct method would be to open up seams, remove the excess width on the interior seam allowances and close everything back up with hand and machine stitching.  This takes a bit  more time, and an alterations specialist's time is your money!  I have yet to find a parent or teen that opts for the more expensive, correct method for prom dresses.  (Note:  Cheater methods are not my first-choice alteration for wedding dresses!)

I've talked a lot about the waist stay and gaposis.  Now I want to discuss style.  People, not everyone can carry off the strapless look.  It's like everything else regarding fashion.  We need to be honest about our bodies, our overall shape, what areas we would like to highlight, and which areas we prefer to cover up.  Strapless dresses have different edge treatments that can enhance or detract from one's shape.  Let me give you examples.

Some girls are large-sized and curvy.  I once saw a girl large-sized girl with broad shoulders and thick arms, and she was wearing a strapless dress with an almost perfectly horizontal top edge.  It took a wide silhouette and made it even wider.   Not only that, the gown had a Cinderella style skirt--very large, poufy, and again...wide.  It was a beautiful dress.  The girl was large and beautiful.  However, the dress simply did nothing for her.  The horizontal strapless edge gave her the appearance of having linebacker shoulders.  The voluminous skirt added many visual pounds she didn't need.  The two just didn't match.

I don't want anyone to think I'm picking on curvy girls wearing strapless dresses, because, let me tell you, their thinner counterparts have issues going on as well.  For example, one of my pet peeves is when a strapless dress falls too low on the torso.  Some girls have long torsos and the dresses just aren't made to accommodate their extra body length.  You'd think they would look great in a strapless dress, but it doesn't always happen like that.  (Remember, prom dresses are typically made for the masses with an average torso length.)    Therefore, the top edge of the dress falls too low on their bodies and makes it look like it's pulling everything south.  The right type of strapless dress should make the twins look perky and round, not long-ish and stricken by the forces of gravity.  That eventually happens on its own lol.  These girls often feel overexposed and will resort to "chicken wings" to cover themselves back up.  Long torso girls have to pay attention to where that top edge falls on their bodies.  The dress might not be working for them.  It's best to have a parent along to give them a better perspective and an honest opinion about the fit of the dress.

Another thinner counterpart may have the issue of broad shoulders, broad chest, and/or thicker upper arms but overall be relatively thin.  In this case, if the girl is dead set on having a strapless dress, I would recommend one with a curvy top edge.  See Julia's Dress.  Her cups curve in and down at center and are very flattering.  A straight, horizontal edge is visual width (think added visual pounds), and curvy edges of a strapless dress will soften the silhouette in the shoulder/chest areas.

In conclusion, I'm trying to impart a few points I feel are really important:

1.  Think about your figure.  Is a strapless style right for you?   Take along mom or dad and ask them for their honest opinion if you are having trouble formulating your own opinion on the matter.

2.  Does the strapless dress have a waist stay?  If not, consider having one installed on the dress.  It anchors everything above and below the waist.  If you want your strapless dress to stay up comfortably, it's NOT done at the top edge--it's done at the WAIST!

3.  Examine the top edge of the dress.  Is it a perfectly horizontal line?  Does it have curvy cups?  Is it working for your overall silhouette?  Is it flattering your neck, shoulders, and arms?

4.  Look for gaposis on the top edge, those gaps where the dress edge stands out from the body instead of hugging it.  Gaposis is annoying, not very pretty, and the dress will need to be altered to fit your upper chest.

I hope this post has empowered you with some basic knowledge on the structure of strapless dresses as well as an awareness of fit issues regarding strapless dresses.  Now get out and start trying on some prom dresses!  Pay attention to what is going on in the mirror and drag along at least one of your helpful parents for an honest assessment of styles appropriate for your figure.

Happy Prom Dress Shopping!

--Kat