Wednesday, December 18, 2013

Haley's Wedding Dress, Part 1A: Bodice Gape


Hello everyone!  I am working on a wedding dress right now.  It's one of those projects which I thought was going to be a lot easier, but the inner structure is a bear because it will take multiple fittings.  Multiple fittings, out-of-town bride, scheduling issues strike fear in me lol.  It IS over a year until the wedding, but a bride-to-be out of town makes me just a wee bit nervous.  I gave Haley the option of contracting locally on her end to have it done, but she requested I proceed with the alterations.  Okay...

There is a reason why bridal dress alterations ring a loud cha-ching.  Delicate fabrics, beading, mucho seam ripping and handstitching, along with making sure the work surface and area is pristine and clean.  Not only that, it means being careful, very careful.  Not only with the fabric, but with myself.  Pin pricks draw blood, you know.  Blood and wedding dresses do not mix.  I am in possession of "THE" dress of one of the most important days in a woman's life.  Need I say more?

A few days ago I started the seam ripping on the upper edge of this dress.  The fitting issue I'm trying to fix is quite common.  The upper edge is gaping, which means the top edge is standing away from the body.  The top edge needs to hug the body, so this is an alteration that needs to be performed first.  If you've read my other blog posts, you understand that I use a top/down approach.  Alterations start at the top, then move down.  The gaping occurs only in the front, so I'm going to pull in that front side seam only.  The back edge hugs Haley's body perfectly so the back edge and back side seam is left alone.

Tonight I proceeded with more seam ripping.  The pic at left shows the upper edge of the side seam of the bodice.  The pinned area is the amount which needs to be taken in at the side seams.  Once I open up the seams, I will hand baste the line of pins so they can be removed and I can follow a new stitching line.  The left side of the vertical side seam is the front of the dress.  The right side of the vertical side seam is the back.  All the beading in this general area needs to be removed and the remaining beads 1" beyond that point need to be secured with additional hand stitching.  One side seam is already done.  In addition, the tucks on the front will need to be hand stitched into place in the area where new seamline is going to be stitched.

 Now let's take a peak inside the fashion fabric and lining in the pic at right.  I've opened up the two layers at the side seam so you can see the good stuff inside.  What you're looking at in the top half of the pic is the boning attached to the fashion fabric (dress).  Both layers have large seam allowances.  Hmmm...yes, the dress could be taken out if it wasn't large enough, but no extra beads were supplied.  What?!?!  I guess this is where a bridal salon would have an excess supply or can order the beads for the dress.  I really don't know, though, because I have never worked at one.

A closer look at left reveals the boning with a cap of extra fabric at the top edge of the Rigilene boning.  This is so the boning edge does not poke through the fabric or poke uncomfortably at the skin of the bride.  Typically when I work on custom dresses for my daughters, the boning is stitched to the lining.  In this particular dress, however, the boning is stitched to the seam allowance of the fashion fabric.  Just one stitching line down one of the seam allowances so the stitching line doesn't appear on the dress fabric of the bodice.

Now for the big Oops of the night!  My seam ripper broke.  Blech.  I'll buy a new one when I'm at work.  The tip and base snapped right off and flew into my kitchen.  Thankfully I wear my glasses when I'm doing work like this.  Broken pins, seam rippers, and other tools can become dangerous projectiles.
A broken seam ripper is really not a big issue.  But let me tell you what is!  I was using the metal tip to rip a few last stitches of the night, and the metal tip fell into the dress between the fashion fabric and lining.  Guess who is going to be spending a fair amount of time searching for the little sharpy tip :( .
 
My last pic for the night shows the fashion fabric at the top of the pic at right and the lining layer below it.  What you're looking at is the inside of the dress bodice that lies against the chest and bust.  The vertical boning at the side seam is attached to the fashion fabric, but the cross boning is stitched to the lining.  This is a bit trickier because now I have to open up the lining layers to unstitch the cross boning near the side seam and trim it down.  This is where I decided to stop for the night.   Tomorrow I'll do a bit more seam ripping and make a trip to the hardware store in the next few days to pick up some plastic sheeting.  I'm going to have to remove the dress from the bag and manipulate the fabric to locate the metal seam ripper tip.  Oh joy! 
 
This brings me to another point.  When I'm working on a specific part of the dress (like this upper edge), I don't remove the dress from the bag.  It stays in to prevent any dirt from getting on the rest of the dress.  I only remove the dress when it is absolutely necessary, and then it's time to pull out the plastic sheeting.
 
Stay tuned for Part 1B in a few days!
 
--Kat

Tuesday, April 30, 2013

About those Hemlines!

Last week I had to do a second fitting on one of my clients to check the hemline.  I momentarily panicked seeing a front hem 1" shorter than what was measured at the previous fitting.  I spent a good 45 minutes at the previous fitting checking and rechecking my hemline pins.  It was perfect that day.  I knew there were no miscalculations on my end, then it dawned on me:

It was a "Perfect Posture" issue.   

Two things will "change" a hemline length:

  1. Perfect Posture
  2. Gaining or losing weight
My client was looking in the mirror as I was checking her hem and was assuming a perfect posture stance throwing her shoulders back which can sometimes elongate the torso, thus raising the hemline.  Today's teens tend to have the rolled, forward shoulder stance due to a combination of factors like computer work, sitting at a school desk during the day, and constantly being slumped over while texting.  Attaining the perfect posture stance lasts for maybe a minute.  Then that stance becomes uncomfortable, they become more comfortable, and their "normal stance" takes over. 

One thing I will NOT tell my clients to do is, "Stand up straight!"  It doesn't work.  They will not maintain that posture during the entire prom event.  Their normal posture takes right over.  And that is what I want--normal posture when I'm fitting prom dresses.  Sometimes perfect posture will "cure" some other appearance issue which needs to be brought up, but perfect posture doesn't help me at all when I'm working on a hemline.  I need to hem a gown with normal posture.

The second thing that will change a hemline once the gown has been altered is weight.  How is this so?  I'll use balloons as my example, but one could use a baseball, softball, and basketball instead of balloons for this example as well.  Blow up a balloon about halfway, seal it, then put it on the floor.  Now cut a square of fabric to cover the balloon so some of the edges hit the floor.  Blow up a second balloon twice the size of the first balloon, place it on the floor, and cover the balloon with the SAME PIECE OF FABRIC.  Do the fabric edges touch the floor?  NO!  Because the balloon has grown in size.  Now you tell me, what would happen to the fabric edges if the second balloon was smaller than the original balloon?

Another example would be to examine dress or top hemlines.  See my rough-sketch hand drawing:


What happens to pregnant ladies as their tummies expand?  Their front hemline rises (assuming it's not a maternity top or dress), and if you look at a pregnant woman from a side angle wearing a regular (non-pregnancy) shirt, you will notice their front hemline is higher than the back because it takes more fabric to cover their expanding bellies.  It not only happens on pregnant women, it also happens on women who carry a lot of excess weight in their belly area and/or large-busted women.  Men are not immune from this problem either.

That is exactly what happens with body bulges from gaining weight.  The hemline will rise.  This has given me pause to consider bringing a scale along to my fittings to check for weight gain/loss.  I don't control someone else's weight, but the dress I alter is a reflection of my work and their weight gain has a direct bearing on the appearance of my work. 

The reverse is also true.  If a girl loses the weight, the dress hemline may appear longer.  The example I give for this is one most of us women are familiar with--snug jeans.  Snug jeans have a crotch seam that hugs the body.  If weight is lost, less fabric is needed to mold around booty, hip, and tummy curves.  Thus, the jeans become looser, the crotch seam is not as snug and begins to drop away from the body and hang lower, and the hemline of the pants suddenly seem to grow longer.  (No, sorry to say you did not get taller, but your tummy and tush did get smaller lol.)

Bumps and bulges are also a reason why many gowns cannot be altered the same hemline amount all the way around the dress.  Some areas of the hemline will have deeper hem allowance than others depending on where body fullness occurs.  This is why I need to hem a gown while on a body. Most girls have curves and the dress needs to be hemmed to accommodate their curves wherever they may be. 

So, to wrap things up for this post, two things that can have an impact on altered hemlines are posture and weight gain or loss.  Give me normal, relaxed posture and maintain the weight.  Anything more than 5 lbs. can affect the altered hemline depending on body type and where a girl tends to put on weight.  Follow those two basic rules for a perfect prom-day look, and both of us will be very happy :) !


Saturday, April 6, 2013

Jessica's Dress No. 1

This post is about Jessica's Miracle dress from last year because that is truly what it was!

I received a call a few weeks ago from Jessica.  She is going to the prom again this year and needed her dress altered so we scheduled some fitting appointments.  I was going to wait to review her dress from last year because it is a special case situation, however, I figured while I was working on her 2013 dress I might as well type up a post on last year's dress while I was thinking about.

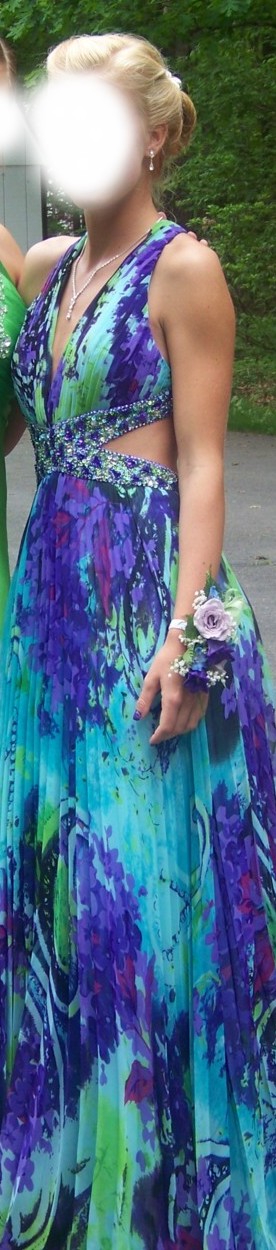
Here she is looking lovely in her dress from 2012!


It's as perfect as one could get without a huge invest of time in alterations that would probably be 50% of the cost of the dress (perhaps this is a lowball figure because of some serious bodice beading/sequins) .  There is a point to this dress in that is was the most difficult dress I worked on last year.  You see, the shop should have NEVER sold her the dress in the size she left the shop with.  It's unbelieveable, yet believable at the same time, that a bridal store would allow a customer to leave with a dress that was too small on the bottom and too large on the top.  Altering the top alone, even with the beading and sequins, could have worked just fine.  It's the bottom half that befuddles me.  There was not nearly enough fabric to fit her lower half doing a standard alteration letting out side seams.  When I look at her prom photo, I can't believe how the hang of her dress is so smooth and clean.  Trust me, it did not start out that way.  When an ill-fitted prom dress brings tears to a girl's eyes before any fittings have begun, I place the blame on the shop that sold her the dress.  Prom dresses should bring smiles, not tears.

Before I even get into the alterations that were needed, let me tell you a little something about zippers.  There are basically two types zippers you will see on formal and semi-formal dresses:  regular zips and invisible zips.  Both are common in off-the-rack RTW garments purchased from clothing stores as well.  The problem with invisible zips is that, although they are nicely concealed, I have NEVER felt them to be secure especially in fitted garments.  My daughters can break an invisible zip on a close-fitting dress or skirt within the first two wearings of the garment and have done so.  So it drives me insane that close-fitting formal/semi-formal dresses mostly utilize invisible zips.  They have the tendency to just pop and cease functioning.  It has happened to at least one of my daughter's friends on the day of the prom.  Why my daughter didn't advertise my services to rescue her I'll never know.  The poor girl resorted to pins to keep her dress together in the back.  Can you imagine?!?!

The invisible zip issue popped up on this dress, no pun intended.  At Jessica's first fitting, her dress was so tight in the mid/upper back that I pushed the two pieces rogether at the center back and asked her mom to zip up the dress.  Her dress was far too snug in the back--a broad back issue. Her zipper was itching to pop.  The front top of the dress was totally opposite--the top front edge had some major gaping.  Part of it is posture--forward shoulder (texting generation) but the bigger issue (again, no pun intended) is that this dress was made for C/D-cup girls and Jessica is more of an A/B.  It's an odd sort of thing to deal with in a way.  There's a good amount of gaping in the front, yet the dress is so snug in the back with flesh spillage above the top edge.  The back simply couldn't "steal" fabric from the front to get the dress to fit in this case. It just wasn't that easy. 

Think of it this way, however.  One can have a strapless dress that fits great in the back, but there is gaposis in the front.  I once made a dress with this very problem.  The front needs darting exactly where the gaposis is occurring.  Tightening up the side seams does not work because the back is already perfect.  Sometimes deepening the front side seam will work, sometimes not.  It all depends on the individual's shape and curves. 

So...these were the alterations I performed above the waist:

  • Create two long-ish darts in the front bodice exactly where the gaposis was occurring.  This required removing beads and sequins, removing some excess fabric, and reattaching the bling.  The goal was not to reshape the bodice to fit her bust (although that would have been ideal), but to remove the top edge gaposis.  There was no way I was going to remove all those beads and sequins to reshape the bodice.  It just wasn't worth it--the cost of the dress vs. cost of alterations ratio going on here.
  • Removing the back zipper and creating a new V-shaped panel from the excess cut off from the hemline.  This added at least 2-3" of width from the top edge tapering to the waist.  The extra beads and sequins that were removed from the front were added to the back.
Now on to the waist and below.  What I had to deal with was unbelieveable and unacceptable, and I place full blame on the dress shop that sold her this dress.  Were the store salespeople actually paying attention to her when she tried on the dress?   In my reviews I always talk about "issues" ;) .  And here is yet another issue I have:  stores that sell a dress just to make a sale.  It's unethical.  What did I have to deal with?  Before I list the alterations that were necessary on the bottom half, this is what I saw during the initial fitting:

  • Horizontal strain lines across the hip and butt.  The dress simply didn't have enough width to accommodate these areas.  See (at right) for my hand-drawn pic illustrating her body wider than the skirt portion of her dress
  • Hiking up of fabric.  The dress was trying to find it's place on her body.  The A-line skirt portion of the dress was moving up to find a spot where things would fit.  This leads to puddling of fabric near the tummy and high hip.
  • A good deal of asymmetry.  The right side was larger than the left by a noticeable amount.  Jessica is a soccer player, and I've seen noticeable asymmetry in my girls that play soccer.  The too-tight hip and butt areas were made even worse by the asymmetry which caused the lower half of the zipper to veer to the right.  (See pic below.)  It wasn't a little, it was very noticeable.  Between 1-2", closer to 2 from what I remember.
The first thing that needs to be done is to check the side seams on the lining and the dress.  And here's the big problem:  there was far too little fabric in the seam allowances to add the necessary width that was needed to fit the dress.

This should have never happened.  It makes me wonder what the salespeople at that store tell their customers.  Is it, "Oh, don't worry.  Our seamstresses can fix it."  Let me tell you something.  There is only so much a seamstress can do, and then they have to turn to creative options.  To tell the truth, I'm not exactly sure how the store seamstresses would have handled this too-tight dress.  It would have required extensive alterations at a cost I deem unacceptable given the price of the gown.


At this point I need to get creative to get this dress to fit.  See my hand-drawn illustration of the A-line skirt of her dress with the midriff band at right?  Lucky for me and lucky for her, Jessica is shorter than average which meant I could "play" with the dress.  While she had the dress on for her fitting, I moved the skirt up by about 4" total by making a 2" tuck and tucking it under the midriff band.  I handtacked the entire skirt in place on the midriff band.  I  did this across the entire skirt.  The premise for this alteration is the A-line has more width the further down the skirt.  By bringing the skirt up and tucking some excess under the midriff band, a wider part of the skirt can now fit her hip and bum.  Whew!  We would have not had this luxury had she been tall.  This is also a secondary reason why the entire zipper was removed and reinstalled.  I can't perform a tuck at the center back with the original invisible zip still installed on the dress.

The asymmetry issue was still there once this alteration was completed, however, it was minimal.  I tweaked the side seam a little bit to add some room to make it even less noticeable.  It wasn't perfect, but overall the fit was good and the asymmetry wasn't noticeable unless one knew to look for it.

Back to the zipper, I couldn't find a zip in a matching color so I reused the invisible zip BUT...I stitched the invisible zip in as a centered zip.  A centered zip requires a line of stitching along each side of the zipper (2 lines total, one on either side of the zip).  My feeling was this would give the zipper a bit more strength during wearing.  Again, I'm so NOT a fan of invisible zips and wish no manufacturer would install these on fancy dresses.  Some people talk about putting invisible zips on wedding gowns and I'm totally against it if the dress is snug or close-fitting.  Any zipper that can't take the stress of my two teenage daughters does not deserve to be used these expensive dresses on such an important day.  Zipper failure is not fun.

On Jessica's dress, I had to create a V-shaped panel to add necessary width shown below. 


Notice that there is about a 4" gap at the top edge tapering down to nothing at the end of the zipper.  Create a V-shaped panel is tricky.  A seamstress needs enough extra fabric to create the panel, however, I couldn't cut it on grain with the piece I had.  I had to interface the heck out of the panel so it wouldn't stretch and distort too much.  Yes, the thought of doing a pretty corset back popped into my brain, but I nixed that idea because I was working on the front at the same time.  I wanted to go with a sure bet making the dress feel as comfortably snug as possible all the way around.  I didn't want her to have any surprises nor fiddling with corset ribbons on prom day.

I tried to make the zipper panel a decorative focal point as opposed to a noticeable fit fix.  When I saw it on her body conforming to her curves, it looked so nice.  The picture doesn't do it justice.

Once these alterations were done, I moved down to the hem.  Since Jessica was going to switch to flip flops right after pictures, we opted for a floor-skimming length.  I was worried about her and glad she chose flats.  She had knee surgery, and I worry about hem trips and caught heels. 

Overall, I was so happy to see her smile in this picture.  The fit of her dress is so different that what I saw and had to deal with at the initial fitting.  I feel that the store did her a grave disservice by selling her a dress that was too small below the waist and not advising her properly on the cup size/fit on the front bodice and the too-tight back bodice.  Her mom is a very smart lady who did some research on this dress and found the manufacturer-recommended size is one up due to her measurements.

I do think the end result was very nice.  There is only so much one can do with a too-small dress, but I was able to perform small miracles here and there to get it to a fit that was acceptable and one that would look very pretty on her on Prom day.

The most important thing to remember about Jessica's dress is that it is a teaching tool.   A-cup and very small B-cup girls need to look for dresses that generally have a decent fit in the bust area.  There are some designs which simply aren't suitable for the small-chested.  Sometimes certain areas are just too-large to do an easy fix and when the sequins and beading are factored in, it can become a mini financial nightmare. 

Stay tuned for Jessica's 2013 dress.  She chose VERY well in a dress that flatters her figure and looks terrific on her with minimal, cost-friend alterations.  That's the way it should be. 

Tuesday, April 2, 2013

Chloe's Dress

If there was ever a girl with an ethereal look, it would definitely be Chloe!  She's so naturally pretty and looks heavenly in this light, mint-colored dress.

She needed a few alterations to perfect the fit before prom day:

  • Shorten the single shoulder strap
  • Tighten the side seams above the waist
  • Hem the dress and lining
Note her dress has a beautiful, decorative panel.  Performing alterations on heavily beaded and sequined areas typically run above the standard price for an alteration.  It's not just simple stitching, but removing beads and sequins in the areas to be altered, reinforcing the beads and sequins that aren't going to be removed, performing the alteration, then reattaching beads and sequins in the altered areas.  This is tedious work that takes time, and remember, time = $.

The dress lining was hemmed a little shorter than the new dress hem for ease in walking.  This is one of those dresses where I wouldn't hem the lining any more than a 1" difference from the dress due to the sheer outside fabric.  It's all about the heels though.  Heel height and dressy shoes will help a girl decide an appropriate hemline.

Speaking of hemlines, there are two basic hemlines I will perform on prom dresses.  One is the narrow hem using the narrow hemmer foot on a conventional sewing machine (sometimes a finicky task especially on pesky bias curves) and the other is using a serger with regular or decorative threads for a rolled hem.  Which is easy peasy?  The serged rolled hem, of course!  The much pickier of the two is using the narrow hemmer.   Last year (for the first time), I used my coverstitch machine on a prom dress made out of a knit which I have yet to review.  Sometimes I explain what type of hem I plan on using based on certain circumstances, although sometimes I'm not sure at the initial consult.  My intentions are to keep the look of the original hem if possible.  I'm fairly sure I used both types of hems on this dress.

Take another look at Chloe on the day of the prom.  She is an ethereal beauty in a dress that is perfectly suited for her.  She has a fabulous figure, is well proportioned, and is one of those girls who could rock virtually any prom dress style.  She has an elegant dress fitted to her figure and looks amazing!  She's just gorgeous.

Monday, April 1, 2013

Karly's Dress (No. 2)

Karly attended two proms, two different years, requiring two different dresses.  I say "require" because this is something some dads do not understand.  Most teenage girls will tell you it is unacceptable to wear the same prom dress two years in a row.  It's just not going to happen ;) .  Moms understand.  They don't like it (for monetary reasons), but they completely understand about the wearing-the-same-dress-twice rule.

I already reviewed her second prom dress, but this was the first one she purchased for the prom she attended during her Junior year of high school.

Here she is in her lovely dress:

The was the first prom dress I altered several years ago, and I can't remember if I had to alter the straps, however, the dress needed hemming and a bustle.  It also had another issue that needs to be discussed in a bit.

The dress hem had two layers: the lining and the dress fabric which is typical.  Lucky for me, both were free hanging meaning they were not attached with the exception of a couple of swing tacks that could be easily clipped to separate the two.  Her heels were about 3" high, and she opted for a floor-skimming hem length for the dress.  The lining, however, was hemmed a good 4" higher than the dress hem.  Rather than have two hems that could get caught in a heel, the only concern was the dress itself.

This shouldn't be done for every dress particularly if the dress fabric is somewhat sheer and delicate.  That's when I would hem the lining just a smidge shorter (1/4-1/2") than the dress.  Sheer fabric needs the protection of the lining.  The dress fabric for Karly's dress was a medium-weight knit fabric which wouldn't be excessively damaged by a heel.  So, to recap the hemline length, the dress hem skimmed the floor, the lining was hemmed 4" shorter than the dress.

Once the dress was hemmed, we could tackle the bustle.  We experimented with a few options, and she chose this lovely bustle style which added further emphasis to the beautiful beaded, crystal design right above her bum.  The photos don't do the bustle style justice.  The fabric had beautiful drape and fell in soft folds which produced a very elegant look.  She received several compliments on her bustle, and this was the dress that inspired Kristin to ask me to bustle her dress.

There is one issue I'd like to discuss regarding this dress bustle.  The bustle design we used produced side seams that swing to the back.  On a perfectly fitted dress, side seams should hang straight.  Is anyone going to notice and tell her, "Gee Karly.  Your side seams are swinging backward."?  NO!   Not unless they're an Alterations Specialist or a home sewer that knows a thing or two about the fundamentals of fit ;) .  Is it going to matter?  Let's see.  Does the side seam issue affect walking?  No.  Does it affect the overall design and silhouette of the dress?  No.  Is it noticeable?  No.  Now that we both know this is happening, does she care?  No.  Now I'm going to ask you readers--did you notice the side seam issue right away, or did you pick up on it after I mentioned it?  'Nuf said.

The bustle alteration verdict:  the side seam swinging backward did not matter to the wearer and did not affect the overall fit, silhouette, and movement in the dress.  Therefore, it was a non-issue. 
 
There is yet another issue with this dress, and I'm not sure if anyone picked up on it right away.  The bust cups do not match the shape of her breasts.  She decided to tape everything in place with body tape, but in retrospect I should have padded the cups to angle the girls inward to fill out dress or take in a seam for a closer fit.  This was the first dress I altered and at the time, and when we discussed taping to fit it should have been as a test during a fitting.  It wasn't, and looking at these pics post prom, I see the cups would have benefited from additional padding.  It was further confirmed when she told me the tape became itchy while she was at the prom so she was ripped it off and discarded the tape in the trash.  This was a learning moment for me.  If it doesn't look right during a fitting, address it during the fitting and do the alteration.  Don't assume tape will produce the right look on prom day.  Leave nothing to chance.

Overall, the dress looked lovely, and Karly looked beautiful the day of the prom.  


Sunday, March 31, 2013

Karly's Dress (No. 1)

Here is Karly in her superbly-fitted prom dress.  It didn't start out that way though.  There were some issues that needed to be addressed in order to have it molded to her figure, and what a figure she has!

These were the alteration issues that needed to be performed:
  1. Shortening of her too-long straps.
  2. Removing extra fabric in the hip area for a custom fit.
  3. Rehemming the too-long dress
  4. Creating a bustle to her liking.
When I begin alterations, my approach is typically a top/down philosophy because what is altered on the top may have an effect on what happens at the bottom.  So the first alteration to be performed was the shortening of the straps.

On the back of the dress shown below left, you can see how the straps crisscross at a decorative point at the upper back.  I cut the straps, removed the excess, and stitched together at the edge of the decoration.  This allowed a seamless look since it was so close to the area with the bling.  The eye doesn't see the seam, unless you're about 6" away looking right at the decoration.  It was the perfect spot to do this alteration.  This was another one of those "fudged alterations".  Easy and cost effective. 

Once the straps were perfectly fitted to her body, we moved down to the hip area.  She mentioned it was too full.  With her figure, it is not a problem removing some ease.  Ease is the term used for movement room.  There two different types of ease, but I'm not going to get into that.  The type of ease needed for this dress is going to vary because of body type.  There is a basic rule to follow regarding fitting ease (the amount needed to be able to move in a garment):  firmer bodies need less ease and fleshier bodies need more ease.  Therefore, when Karly wanted a dress that was more fitted in the hip area, it was not a problem.  She is slim and firm, not fleshy.  She would still be able to move and sit, and the dress could be fitted with less ease but still provide a clean line that appeared to mold to the shape of her body.  The ease was removed in the high hip/hipline area at center back seam.  This was not my preference, but the side zip dictated where an easy fix should occur.  Of course, I could have opened up the side seams, removed the zipper on one side, performed the alteration, reinstalled the zip, and restitch the lining and dress at a cost of...$$$.   Yet the question remains:  What is the most cost effective fix that will still provide the fit she desires?  It is one that can be fudged.   The question I always have to ask myself is this, "Can the alteration be fudged and still produce a result that is visually acceptable?"  If so, this is what I recommend.  Remember, these are (usually) not $1,000+ dresses and are more in the $200-$400 range.  In my opinion, costly alterations, generally speaking, are typically not the way to go in this price range.  Once the hipline area was altered to her satisfaction, I moved down to the hemline.

The concern I have with hemlines are shoes and wearer preference.  The girls have to have their prom shoes before hemming a dress and subsequently need to know where they want their hemline to fall.  I present three basic options:  skimming the floor, 1/2" off the floor, and approximately 1" off the floor.  I offer my advice but explain to each girl that it is entirely up to them.  What they want is what I will do.  However, I'm always thinking about safety and comfort.  I've seen some girls purchase beautiful 5" heels with their prom dresses and others wearing flats.  What to do, what to do?!?!  My recommendation is usually to go 1/2" off the floor with anything over 3".  One heel caught in a dress for any reason can literally knock a girl off her feet in the blink of an eye.  If a girl has pretty shoes she wants to show off, maybe 1".  If a girl has flats or something up to 3", floor skimming is fine.

However, it can get tricky.  If a girl has her dress hemmed to a 1/2" above the floor and has 5" (or plus) heels, she's probably not going to wear them when she's on the dance floor.  So...she has some thinking to do.  Once those 5" heels get kicked under the table for partying on the dance floor, her dress suddenly becomes far too long!  It can drag and become uncomfortable with her feet or someone else's feet constantly stepping on the dragging hemline.  So we discuss and try to figure out what she wants to do.  For Karly's dress, she opted for the 1" option.  She had cute shoes that matched the crystals on the dress, and she wanted to show them off.  Her shoes had minimal heel so she could have gone with any option.  Once the shoes were off, the dress skims the floor. 

Once the new hemline was stitched, we moved on to the bustle.  We experimented with different options, and she chose the one she liked best.

End result:  a dress that molded perfectly to her perfect figure, a hemline that was to her liking, and her bustle of choice.  A happy girl with a dreamy figure in a perfectly-fitted dress that would make any girl green with envy!

Note:  This prom dress was purchased off the rack at a prom dress boutique.  For DIYers, a similar style can be whipped up at home using the McCalls 6075 pattern below.  It is currently in catalogs and probably will be available for the next year or two, however, patterns can be discontinued without advance notice.  It looks like a great pattern with different styling options with mix and match pattern pieces. 

Saturday, March 30, 2013

Kristin's Dress


Meet Kristin.  An absolutely gorgeous girl who paid $60 to have her exquisite dress rehemmed.  And here's the problem.  I was asked to do her bustle because she liked the one I did for my daughter the previous year, but had to redo the "professional" hem job for which she paid $60.

I went over her house one day to work on the bustle and found her dress not only had a terribly uneven "professional" hem, it was still too long!  This was the first prom dress I altered other than my oldest daughter's dresses at the time, and my thought was, "I could do WAY better than this!"  Yes, I could, and yes I can.  So...not only did I bustle her dress, I rehemmed it as well.


Hemming is the easy part so I'm not going to discuss that.  What I'm going to talk about is the bustle.  There are different ways to do a bustle on a dress, and I like to work with the girls and their mother by presenting bustling options.  Usually I can see in my mind what I feel is the best option, but I make it the choice of the girl with some parental input.

In Kristin's case, the bustle did the talking.  One pinch, pull it up, and it looked beautiful.  Okay, really it was a couple pinch points to be determined by the length of the dress, but once we got the right spot pinched, the bustle style sold itself.  The tricky part was deciding how to attach the bustle to the waist because it hits the centered zipper so I will explain how I handled it.

I found two, beautiful crystal-like buttons at my local fabric store and stitched them on each side the zipper at the bustle attachment location.  I used some Timtex (a stiffer, craft type of interfacing) on the inside of the dress to reinforce the bustle point area.  This is necessary because the dress fabrics can easily tear or rip with the strain of the bustle weight or with a heel caught in a hemline pulling the bustle down.  When the buttons were attached, I stitched through the dress fabric and Timtex together, treating both as one layer. I trimmed the Timtex to a circle so it wouldn't have points that would cause discomfort for Kristin on prom day.  On the lower part of the skirt, I attached loops created from a serger chain using Decor 6 decorative serger thread in a color that matched the dress.  These attached loops were placed over the crystal buttons and Voila:  A beautiful bustle was born!

Total cost:  approximately $4-$5 for materials.  I didn't charge her for any labor for the hemming or the bustle with one caveat.  She was to tell no one I did her alterations.  I was recovering from a car accident at the time and couldn't handle requests.  Hers was easy.  I had ample notice and worked on it the days I felt well enough to do the alterations. I don't like saying no to prom girls so I wanted to pull the plug on any requests so I wouldn't be forced to say that dreaded word.  

The result?  See for yourself :) !  Kristin looks AMAZING.  She is a beautiful girl in a beautiful dress that fits her like a dream and was finally altered and bustled just right.  The crystal buttons were a perfect match, and the bustle style is perfect for the dress.  The hem is perfect!  (No thanks to the first "professional" hem job that was done by someone else.)  Kristin was a joy to work with, very easy going, and easy to please.